There is any amount of play and experimentation possible with fanfolded copies of identical polygons connected in various ways along their edges, although choosing an orientation and taking successive edges is the best way to begin. The properties of these stacks depend upon the fact that although the fanfold may be opened at any point, only certain depths of stack allow joining the top polygon to the bottom one and still being able to open the stack. Concretely, an integral number of turns of the spiral is required at which points the stack may be opened and for which the conflicting angles between the hinges keep the rest from opening.
Making structures in two and three dimensions results in additional constraints. Turns can always be laid out side to side, with so many on one side and so many more on the other side. With many turns, they may be grouped into blades and found to be arranged around a common axis in three dimensions. With equilateral triangles, and generally where 120 degree angles are involved, three blades may be laid flat in the plane to produce a large polygon made up of the little polygons out of which the full stack was constructed. With triangles this makes a hexagon which is the ``flexible hexagon'' from which flexagons take their name. With sqyares, two blades is enough and you just get a bigger square. A pair of pentagon blades almost lies flat but not quite, and so on.
What matters in the spiral polygon stack is the angle between successive hinges, which lie along edges of the polygons. It is possible to get the angle between successive edges in two different ways (at least, but we are olny going to look at these two). One is to just take the polygon with n sides as it is. The other is to make a stack of n-1 polygons and turn it over. That way you get the angle between hinges by going the long way around, but it's the same angle.
To illustrate this with squares,
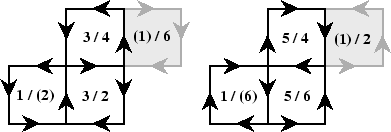
There are eight squares shown here, in two groups of four, which are going to make just one of two blades of the flexagon. So it will be necessary to do everything twice, even though the description will be run through just once.
The marking a/b means that the number (or color) a is to be written (or painted) on top of the square, b on the bottom. when it is enclosed in parentheses, as in (1), that face of the square will be covered up later so there is no point to paint the square, but a faint marking should still be left in place so as to know what to join later on. So although there are eight squares, there will only be six different faces, the other two being lost on account of pasting over them.
Also note that the arrows in these two groups run in opposite directions, because one of them is going to be turned over. The right group should be fan folded as always, but if only three are folded and the fourth left sticking out as a tab it will make joining the results easier. So the wad of three folded squares can be secured with a paper clip (they are not going to be pasted) it is easy to see that the wad meets the requirement of turning forward 90 degrees instead of backwards 270 degrees, once it has been turned over.
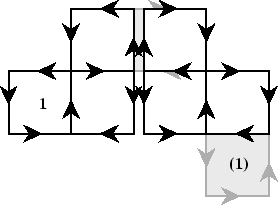
After all this, one will have a package of four ``squares'' (one is that triple which has been clipped together) which is the same as the one used in constructing the primary square flexagon. Two packages with all edges joined make a flexagon whose only difference from the ordinary one is that wad of three squares where one would have been.
Although this construction has the purpose of making the substitution quite clear, there is no reason to make the wad right away, and a group of seven squares could have been made up from the beginning.
Which in turn is half the flexagon.
From the point of view of listing the colors in order along the strip, it would now be written
| 1 | . | 3 | . | 5 | . | 1 |
| . | 2 | . | 6 | . | 4 | . |
| + | + | + | - | - | - | + |
| 1 | 3 | 3 | 1 | 5 | 5 | 1 |
| 2 | 2 | 4 | 6 | 6 | 4 | 2 |
That accounts for the row of plusses and minuses which has been placed on top of the other rows. A + means ``go to the next edge'' whereas a - means ``use the previous edge'' while laying out the frieze of squares. Likewise the sequence of signs defines the sense of rotation of the spiral while reading down the polygon stack.
When it comes to mapping out the cycle of faces in the order in which they will be exposed when flexing the flexagon, it is only necessary to think that one polygon has been deleted, only to be replaced by a cycle running in the opposite direction with one point less. But there is no need to take the deleted point out of the diagram; simply skip over it, to get
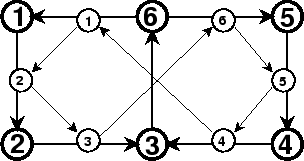
The outer squares still tell the sequence of colors which can be turned up while flexing, while the diamonds are related to the order of appearance of the faces while reading down the stack. Note that the point where the two diamonds touch conforms to the construction, which is to replace the 4 which would have been there by the sequence 6-5-4 running around in the opposite direction, each implying a rotation of -90 degrees.
All of this discussion leads to what could be called binary flexagons, namely those in which one single polygon in a primary flexagon has been replaced by a counterspiral of equal polygons so as to preserve the overall rotation of the spiral. If the counterspiral is closed off, say by lightly pasting it (or better by using clips), there hasn't been any change in the flexagon except for making one of those polygons fatter and giving it an internal structure.
But the interesting obnservation is that the relationship is mutual. If the flexagon is flexed to a point where the wad is on top and visible, there will be a similar wad in the other blade (or repetitions in each blade if there are several), and then the rest of the polygons will be laid out alongside of it. Well, if those are grabbed and stuck together by moving the clip, and the original wad released -- the result will be exactly a mirror image. Hence the reason for calling it a binary flexagon. The same symmetry is apparent in the map, where two equal subdiagrams are stuck together as mirror images of one another.
This is an extremely important construction, and should be practiced with all the primary flexagons which have so far been constructed. As usual, the original model of a flexagon, Arthur Stone's triangle strip, fits rather awkwardly into this scheme of affairs. That is because the next logical step, to replace ALL polygons by their counterstack, is a very natural step for triangular flexagons, but not quite so obvious for other kinds of polygons. So it is easy to skip over the binary triangular flexagon, in spite of its importance as a first logical stem in making more complicated flexagons. So much for trying to build a general theory from special cases!