| ORDER | NUMBER OF FLEXAGONS |
| (2) | (1) |
| 3 | 1 |
| 4 | 1 |
| 5 | 1 |
| 6 | 3 |
| 7 | 4 |
| 8 | 12 |
| 9 | 27 |
| 10 | 82 |
| 11 | 228 |
| 12 | 733 |
| 13 | 2,282 |
| 14 | 7,523 |
| 15 | 24,834 |
| 16 | 83,898 |
| 17 | 285,357 |
| 18 | 983,244 |
Now that you can make any flexagon you want, ``How much,'' you wonder, ``would it cost for adding machine tape to make them all?'' It would, of course, be impossible to make all the flexagons, for they can be built to any desired and practically feasible size. But, considering flexagons with a given number of sides, or, as is usually said, of any given ``order,'' there are a limited number. To find out how many we take all possible different permutation of two-less-than-the-order map triangles which works out to give the values listed in Table I. It may be found amusing to work out a few of these experimentally. As for the numbers involved, order ten seems to be a jumping-off place - beyond there the number of flexagons increases almost astronomically. The moral of this is: Don't be too ambitious; if you decide to make all the flexagons of some order n, keep n well below ten.
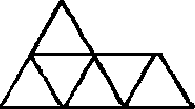
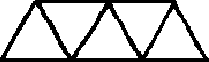
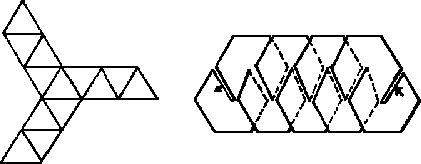
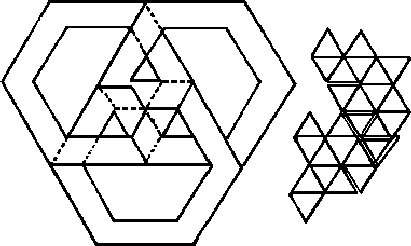
Some flexagon plans are more interesting than others, mostly for aesthetic reasons. We have already seen the stair-like plan of the flexagon of order four, the three-leaf clover formed by the flexagon shown in figure 19 A2, and the flexagon shown in figure 19 A3, which is the first of a whole family of flexagons with plans that form neatly nesting hollow hexagons. There is also a family of nesting triangles, the first member of which has the map shown in figure 20.
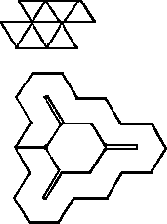
The flexagon shown in figure 21 comes out in a figure eight. A flexagon of order ten has the fascinating plan seen in figure 22. Plans with twists and curlicues are plentiful. Among them are the ones shown in figure 23. Only one-third of the entire plan is shown in this figure. Certain plans even bear a limited resemblance to well-known forms. The plan of one flexagon, which is probably the most twisted plan ever made, could be interpreted as a representation of a sidewinder slaloming across a bed of nails (see figure 24). Particularly amusing to several researchers, for some reason, is the group of flexagons whose plans take on the form of figure 25.
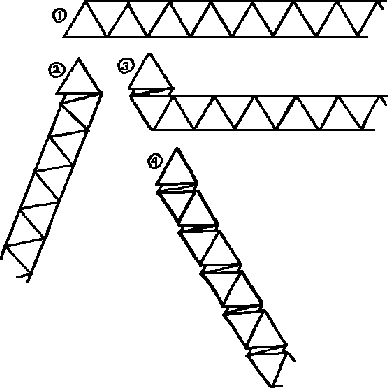
Perhaps the most interesting single group of flexagons comprises those made up from a straight strip of triangles, as was the original three-sided flexagon. Some of these are made by doubling the length of the strip previously used. That is, the second strip (after the three-sided flexagon) would be made up of l8 triangles and subsequent ones of
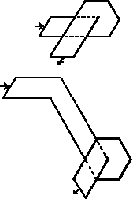
![]() triangles. In folding the flexagons up, the first and second triangles are folded together, then the third and fourth, then the fifth and sixth, etc. (see figure 26). When this has been done, the first and second piles of triangles are folded together, then the third and fourth etc. This is kept up over and over until the strip is nine piles long.
triangles. In folding the flexagons up, the first and second triangles are folded together, then the third and fourth, then the fifth and sixth, etc. (see figure 26). When this has been done, the first and second piles of triangles are folded together, then the third and fourth etc. This is kept up over and over until the strip is nine piles long.
The strip can then be made into the flexagon rather easily. Care must be taken to fold, or rather to wind, the strip up in one direction so that the twists do not go in opposite directions.
The 18-triangle flexagon mentioned, which is the same as the first flexagon of order six (figure 19 A1), is in my opinion the best and most easily made flexagon for demonstration and study purposes. It is usable as an example in almost any discussion. As has been said, it comes in one long straight row of triangles with the sign sequence R L R L R L .... These are wound about one another in the manner previously described (follow figure 26). This results in a straight row of double thickness triangles, which is formed into a flexagon as if it were the plan for a three-sided flexagon. Remain wary of twisting or winding in different directions, which unwinds the flexagon, causing it to fall apart.
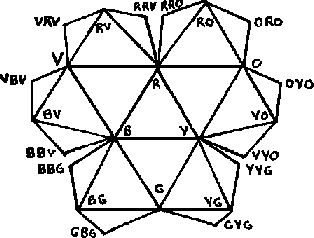
The tri-pole symmetry of the maps of this and subsequent straight-strip flexagons produced by uniform doubling (e.g. see figure 27) provided the inspiration for the discovery of what is, in my opinion, the most meaningful system for coloring flexagons. The system may be used to great advantage in most flexagons but is basically best-suited to the evenly-doubled straight-strip flexagons.
The sides of the flexagon which are represented by the vertices of the central triangle of the map are colored red, yellow and blue - the pigment primaries. The side between red and yellow and opposite blue on the map is colored with the mixture of red and yellow - orange. The side between blue and yellow is colored green, and that between red and blue, violet. In this way we pass outward from the central triangle, mixing adjacent colors. Between red and orange comes red-orange etc. The color-map of the 24-sided straight-strip flexagon is shown in figure 27. Colors are usually not easily distinguished much beyond the second or third ``mixing,'' but this is sufficient in most cases.
Now for the advantages of this system. It is, of course, impossible in most cases to tell at first sight just what the map of a given flexagon is. But this coloring scheme gives us a practical system for ``remembering'' where we are on the map of an unidentified flexagon. We know, for instance, that from the position with blue-green on one side of the flexagon and blue on the other we can go either to green, or if the flexagon is large enough, to blue-blue-green. Thus we can travel anywhere we choose without the aid of a map (although it is necessary to keep the rule of operation of the map in mind). If the map of the flexagon has actually been lost or forgotten, the coloring helps in its reconstruction.
Most people having their first experience with flexagons will find it incredibly difficult to get from, say, green to orange, because this involves a number of consecutive flexes without rotations. The tendency is to rotate consistently after every flex.